The Peli Lens™: What It Is and How It Works
How the Peli Lens™ Works
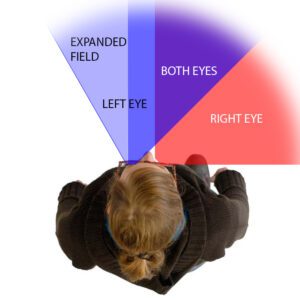
The Peli Lens™ uses high-powered prisms that expand a hemianopic patient’s awareness of their blind side by over 30 degrees, helping them with peripheral vision loss attributed to Homonymous Hemianopia. This awareness enables patients to better detect obstacles and navigate around them.
The goal of the Peli Lens™ is to help patients make the most use of their remaining vision.
By placing peripheral prisms in the patient’s blind side, they can notice movement and contrast from their missing visual field so they know to turn and look in that direction. This often enables patients to significantly increase their awareness of their blind side.
Below you’ll see a view from above of how a hemianopic patient’s visual looks normally and how the field looks while wearing the Peli Lens™.

Homonymous Hemianopia
Visual Field

Homonymous Hemianopia
with the Peli Lens
Why We Recommend the Peli Lens
It’s simple. Because it is the best solution out there, hands down.
There are other options, but honestly, they don’t really work. Or, more to the point, they don’t provide the kind of relief and assistance someone suffering from this condition would really need. If you want to learn why, we put together a handy primer here.
Getting the Peli Lens for Your Patients
Do you think your patient would benefit from the Peli lens? If so, we recommend the following steps to make the most of it. Once you determine if it’s for sure the right solution for your patient’s vision issues, getting the lenses is straightforward and simple.
1. Determine the patient’s loss of vision, what is causing it, and whether it is an issue the Peli Lens can address.
If the Peli Lens is a good option…
2. Discuss the benefits of the Peli Lens with your patient and demonstrate to them how to use the Peli Lens in-office using our Peli Evaluation Kit (more on this shortly...)
3. Provide fit training prisms for your patient*
4. Monitor routine at-home training
5.Order the full-power Peli Lens
*The Peli Lens™ should only be fit by or under the direction of a physician or other qualified ophthalmic professional.
Any prism can be disorienting to patients when they first try them, and the Peli Lens™ is no different, which is why we recommend that a patient wear training prisms for 4-to-6 weeks and spend about 20 minutes a day performing self-training exercises to help with adaptation. To make it easier, we’ve created a training protocol to help patients with this process. You can access it and tons of other useful information here. (link to patient resources page when built)
Once your patient has successfully completed a 4 to 6-week trial of the Peli Lens, we recommend moving to the best option for long-term use: full-power prisms. These prisms offer increased field expansion in a more durable, resilient, and effective form than temporary prisms.
The Peli Evaluation Kit (PEK)
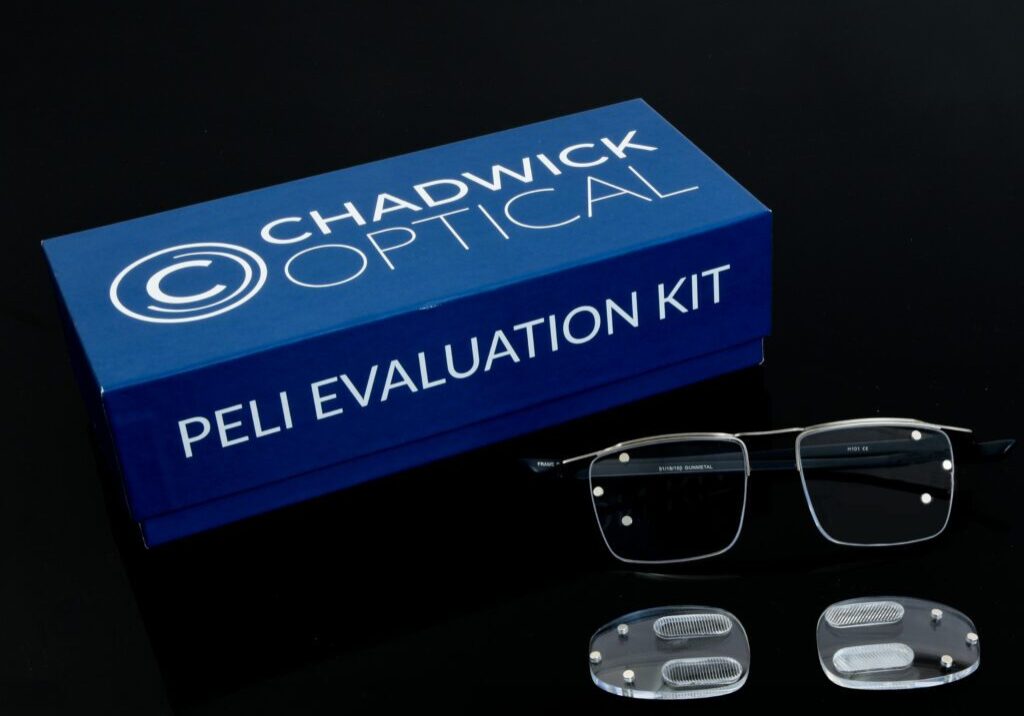
If you’re a doctor or vision specialist who helps people with visual field loss, you need to know about this magical thing called the Peli Evaluation Kit (PEK). The PEK is an all-in-one solution for you to quickly demonstrate the Peli Lens to your patients and determine if they can benefit from it.

So, how does it work? Easy. Your patients take the Peli Lens for a test run so they can see the before and after effects of the Peli Lens, and YOU get the chance to perform a subjective assessment on your patients and their experience using the lens. That’s it.
The kit provides you with a modern fitover and two lenses attached by magnets, which, when attached to glasses, enable you to test horizontal or oblique peripheral prisms on either eye.
NOTE: Training prisms are exactly that – a tool to help patients ensure that peripheral prisms are right for them and a way to integrate the benefit into their everyday lives before investing in the full-power Peli Lens. Training prisms are meant to be used for a maximum of 4 to 6 weeks. Once the patient accepts the benefit of training prisms, they’re ready to move on to full-power prisms, which will offer roughly twice as much field expansion in a more durable, portable format.
SLAM: Single Lens Attached by Magnets
While we can embed Peli Lens peripheral prisms into nearly any lens, some people just don’t want to carry a bulky fitover or don’t want to deal with a fragile clip-on lens. Being the tinkerers that we are, we set to work and think we’ve found a solution: our Single Lens Attached by Magnets (SLAM) device.
SLAM technology enables us to create a single removable lens that attaches to your patient’s glasses lenses via magnets.
The Peli Lens using SLAM technology offers:
- Staying Power: our Peli SLAM solution stays put even when vigorously shaken or jostled
- Durability: designed to last for years to come, the Peli SLAM is a rugged, highly durable option for patients on the go
- Comfort: a single lens weighs less than all other options, offering maximum comfort when worn
- Portability: at less than the size of a business card, the Peli SLAM lets your patient easily take it with them wherever they go
- Flexibility: patients can wear the Peli SLAM when they need and simply remove it when they don’t
- Versatility: patients can wear the single lens over their normal glasses or over their sunglasses, making it ideal for both daytime and nighttime use
Best of all? Your patient can continue to use the Peli SLAM even if their prescription changes (provided they retain their original frames). This makes the Peli SLAM a permanent, cost-effective solution for patients in the long run.
When to Use the Peli Lens
The Peli Lens is designed to be worn as a mobility device. Because the peripheral prisms can hinder patients during certain activities such as reading, computer use, and watching TV, fitting peripheral prisms on a pair of glasses the patient wears all the time is not advised. It is important that the patient be able to choose when to wear the lens.
Adapting to prisms can be very disorienting at first, which is why we highly recommend training your hemionopic patient with a range of exercises created to get them used to wearing their Peli Lenses.
Additional Resources
Looking for more information?
We have compiled a whole repository of resources just for the occasion!
Still have questions or need assistance? Reach out. Our team has significant experience helping doctors and patients with every step of the Peli Lens process and we’re eager to help you as well.


